How to Edit Love Handles in Photos (Naturally)
Published · Updated
Quick answer
To edit love handles in photos, start with a three-quarter stance and side lighting, then make a small waist-slim edit inside a tool's natural limit. Chisel's waist slider marks that limit in green so the taper still matches the rest of your body.
Key takeaways
- Camera angle and lighting remove more love-handle shadow than any slider does.
- A three-quarter stance shows your real waistline instead of your torso's widest point.
- Chisel's waist tool maps your torso automatically and marks a green natural limit.
- Small, proportional edits across the waist and shoulders look more believable than one big move.
- Manual tools run on your phone; the optional AI Transform sends the photo to a cloud provider and asks first.
Editing love handles out of a photo comes down to camera angle, lighting and a careful waist slim — not a diet or fitness change. Here's how to edit love handles in photos so the taper still looks like your real body, using Chisel's green natural limit as the guide.
Why do love handles show up in gym and mirror photos?
Most "love handle" shadow in a photo isn't really about your body — it's about the camera. Shooting straight-on under flat overhead light flattens your whole side profile, so any soft tissue at the waist reads as a bulge instead of a natural curve.
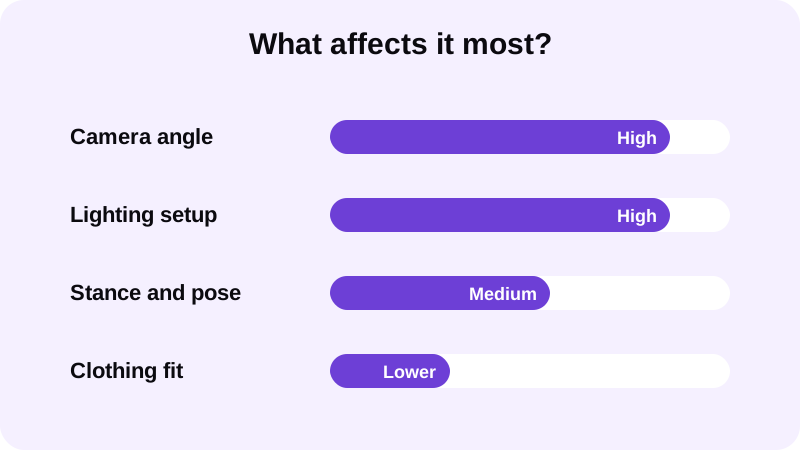
Stance matters more than most people realize. A three-quarter turn — shoulders angled slightly away from the camera — shows your real waistline instead of the widest part of your torso. Pair that with even, not-too-bright side light (see our guide on gym photo lighting) and a lot of the apparent softness at the waist disappears before you touch an editor at all.
Arms held slightly away from the sides, rather than pressed against the torso, help too. Pinned arms push soft tissue outward and exaggerate exactly the area you're trying to clean up. What's left after you fix stance and light is a smaller, final edit instead of a heavy one — and a smaller edit is always easier to make look believable. If your goal is simply to hide love handles in photos before posting, these two changes alone solve most of the problem.
How do you edit love handles in a photo step by step?
A love handle photo editor works best when you start from a clean photo and make small, proportional moves rather than one big slider drag. Chisel's pose detection finds your torso automatically, so there's nothing to trace or mask by hand before you start.
- Pick a photo where your torso is clearly visible — shirtless or a fitted top both work well for pose detection.
- Open the waist tool and let it map your torso automatically.
- Move the waist slider in gradually, watching the green natural limit — stop right before it, not after.
- Add a touch of ab definition so the new waistline matches the rest of the torso instead of looking pasted on.
- Step back and check the side profile and shirt line for consistency before touching any other slider.
- Export the edited photo in HD, or save the animated before/after reveal if you want to share the edit.
Edit the waist and the shoulders together. A slimmer waist next to the same shoulder width reads as a sharper taper on its own — see how to widen shoulders in a photo for the other half of that shape.
This is also where most of the work to slim the waist in a gym photo happens with the fewest side effects. A small, well-placed move on a clean photo almost always looks better than a large move trying to fix a bad one.
How do you keep a love handle edit from looking fake?
The giveaway on almost every bad waist edit is the same: the slimming doesn't match the lighting or the rest of the body. Shadows stop where the old waistline used to be, or the hips and shoulders still imply the original size. A believable edit changes the whole picture a little, not one spot a lot.
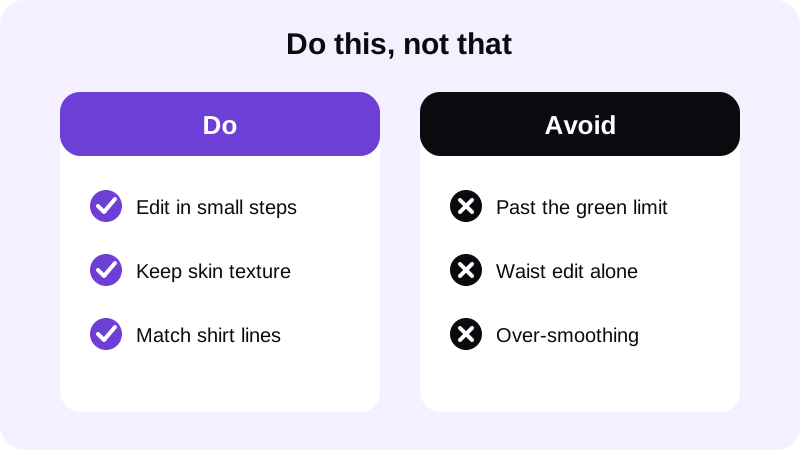
Pushing the waist slider well past the green natural limit is the fastest way to make an edit obvious — the torso stops matching the arms, hips and shadows around it. A common mistake is editing the waist alone and skipping everything else, which leaves one "corrected" area sitting next to an unedited one.
A slimmer waist paired with no change anywhere else can look disconnected — a little added shoulder width with the Shoulders slider, as covered in our guide to adding muscle to a photo, usually ties it together. Good posture does similar work for the same reason: standing tall with shoulders back naturally pulls the waistline in, which is a pose fix rather than an edit, and our guide on fixing posture in a photo covers it in detail.
Is editing love handles out of a photo private?
Chisel's manual editing tools, including the waist slimmer used in this guide, run on your phone. If you use the optional AI Transform feature instead of the manual sliders, the app sends your photo to a third-party cloud AI provider to generate the result — and it asks first before doing that.
Every editing tool in Chisel, including the waist and ab sliders described above, is free to use. Chisel Pro removes ads and the watermark and unlocks Pro templates, and it comes with a short free trial if you want to try it before deciding. Chisel also writes an AI-altered label into an edited photo's metadata, which is a simple way to stay upfront about any photo you share.
When you export, Chisel saves the photo in HD. If your original photo is larger than 2048 pixels on the long side, it gets scaled down to that size when you import it — worth knowing if you plan to print a photo large, though it's plenty for sharing or posting online.
Where else can you learn to edit a gym photo naturally?
FAQ
What's the fastest way to edit love handles in a photo?
Start with a three-quarter stance and side lighting before you open an editor — that alone removes a lot of the shadow. Then make a small waist adjustment with a love handle photo editor like Chisel, staying inside the green natural limit so the taper still looks like your body.
Can you hide love handles in photos without editing at all?
Partly. A slight turn away from the camera, arms held a little away from the torso, and even side lighting instead of flat overhead light will hide love handles in photos before you ever touch a slider. Editing then only has to do a little of the remaining work.
Why does a waist edit sometimes look obviously fake?
Usually because the slimming doesn't match the lighting, shirt line or the rest of the body. Pushing a waist slider past its natural limit, or editing the waist alone while leaving shoulders and chest untouched, is what makes an edit noticeable.
Does Chisel upload your photo when you slim the waist?
Chisel's manual tools, including the waist slimmer, run on your phone. The optional AI Transform feature sends the photo to a third-party cloud AI provider to generate its result, and it asks first before doing so.
Is every editing tool in Chisel free?
Yes. Every editing tool, including the waist and ab sliders, is free to use. Chisel Pro removes ads and the watermark and unlocks Pro templates, and it includes a short free trial if you want to try it.